About
From the version, there is new ways in order to configure a custom skin.
This article shows you how to it with the Approach 2: Deploying Using Shared Folders
Articles Related
Configuration Steps
Extract the file structure of a new skin
The steps below will extract a new skin and move it to default place of older installation.
mkdir /tmp/bicustom-template
cp $FMW_HOME/Oracle_BI1/bifoundation/jee/bicustom-template.ear  /tmp/bicustom-template
cd  /tmp/bicustom-template
jar -xvf bicustom-template.ear
jar -xvf bicustom.war
mkdir $FMW_HOME/instances/instance1/bifoundation/OracleBIPresentationServicesComponent/coreapplication_obips1/analyticsRes
mv res $FMW_HOME/instances/instance1/bifoundation/OracleBIPresentationServicesComponent/coreapplication_obips1/analyticsRes/res/
mv WEB-INF/ $FMW_HOME/instances/instance1/bifoundation/OracleBIPresentationServicesComponent/coreapplication_obips1/analyticsRes/WEB-INF/
After the extraction, the target directory structure looks like this:
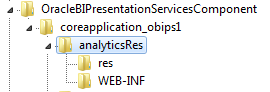
It's important to keep the /res directory because it's hard coded in some link such as the logo.
Rename the skin name
To rename the skin name, you have to:
- rename the s_custom directory to s_myName
- indicate it in the root file /res/filemap.xml
<FileMap>

   <!-- The style name should exactly match the name of the folder, including case -->
   <Styles Default="s_blafp">
      <Hierarchy>s_Skyros / s_myName</Hierarchy>
   </Styles>

   <!-- The style name should exactly match the name of the folder, including case-->
   <Skins Default="sk_blafp">
      <Hierarchy>sk_Skyros / sk_myName</Hierarchy>
   </Skins>

</FileMap>
It's not needed to create a skin directory. If OBIEE don't find it, it will use the sk_Skyros skin
Change the skin files
You can update all file from your skin (See the documentation)
Example with the file graph.xml (old name dvt-graph-skin.xml) where you can change the colors of the graph: you can add the below nodes as child of the graph node.
<SeriesItems>
        <Series id="0" color="#a9b2b1" borderColor="#a9b2b1"/>
	<Series id="1" color="#f47d43" borderColor="#f47d43"/>
	<Series id="2" color="#ffd602" borderColor="#ffd602"/>
	<Series id="3" color="#accbe8" borderColor="#accbe8"/>
	<Series id="4" color="#cdb48c" borderColor="#cdb48c"/>
	<Series id="5" color="#e66665" borderColor="#e66665"/>
	<Series id="6" color="#076bb6" borderColor="#076bb6"/>
</SeriesItems>
Deploy the shared folder as application in Weblogic
The skin folder (FMW_HOME/instances/instance1/bifoundation/OracleBIPresentationServicesComponent/coreapplication_obips1/analyticsRes) must be accessible via an URL. It's then needed to deploy it as an web application.
- In the console, go to deployment
- Lock and edit the domain (Top-Left button)
- Stop the old application analyticsRes and suppress it
- Install a new application with the skin folder path (FMW_HOME/instances/instance1/bifoundation/OracleBIPresentationServicesComponent/coreapplication_obips1/analyticsRes)
- Next > Install this deployment as an application
- Select bi_cluster as the deployment target.
- Set the name to analyticsRes.
- Select I will make the deployment accessible from the following location.
- Next > Yes, take me to the deployment's configuration screen.
- Finish
- Click the Configuration tab.
- Enter /analyticsRes in the Context Root box.
- Click Save.
- Click OK.
- Click Activate Changes.
- Click Release Configuration.
- Start the new application.
- Click Deployments in the Domain Structure region.
- Select the analyticsRes checkbox in the Deployments table.
- Click Start, and then select Servicing all requests.
instanceconfig.xml
- backup the instanceconfig.xml file (fmw_home/instances/instance1/config/OracleBIPresentationServicesComponent/coreapplication_obips1/instanceconfig.xml)
- and modify it properly:
<URL>
     <CustomerResourcePhysicalPath>/u01/app/oracle/product/fmw/instances/instance1/bifoundation/OracleBIPresentationServicesComponent/coreapplication_obips1/analyticsRes/res</CustomerResourcePhysicalPath>
     <CustomerResourceVirtualPath>/analyticsRes/res</CustomerResourceVirtualPath>
</URL>
<UI>
     <DefaultStyle>myName</DefaultStyle>
     <DefaultSkin>myName</DefaultSkin>
</UI>
Restart the BI Presentation Service
The file are loaded during the startup of the BI Presentation service, restart it if you change any file otherwise you can get unexpected behavior.
Viewing the Modifications
If files are added (new, such as an image file), you must restart Presentation Services.
To view your modifications:
- Reload the metadata. ( Admin > Reload Files and Metadata link)
- Clear the browser's cache.
- Click any link on the global header (for example, Home or Catalog) to see your changes.
Support
OBIEE doesn't see the new skin
Double check the value in the node URL > CustomerResourcePhysicalPath in the instanceconfig.xml file.