
Roadmap
Roadmap To install and set up Oracle BI Applications, do the following:
- preinstallation steps for the source system
- Install and set up the Oracle BI Applications components and Informatica PowerCenter components
- Perform the source-independent steps that are required before a full data load
- Then, perform the source system-specific steps that are required before a full data load for the appropriate source system that you are using.
- Perform any required additional source-independent steps described in the section entitled, “Configuration Steps for Controlling Your Data Set for All Source System,” in Oracle Business Intelligence Applications Configuration Guide for Informatica PowerCenter Users. Then, perform any required additional steps for the appropriate source system that you are using.
- Perform the configuration steps that are required before a full data load for all applications that you are deploying. See Oracle Business Intelligence Applications Configuration Guide for Informatica PowerCenter Users for instructions on configuring the different application families.
- (Optional) If you want to customize the preconfigured Oracle BI Applications functionality, follow the steps described in the chapter entitled, “Customizing the Oracle Business Analytics Warehouse,” in the Oracle Business Intelligence Applications Configuration Guide for Informatica PowerCenter Users.
- (Optional) If you want to modify the preconfigured Oracle BI Applications security, see Oracle Business Intelligence Applications Security Guide.
Once you have installed and set up Oracle BI Applications components, configured the modules (optional), and customized Oracle BI Applications (optional), you are ready to start running ETL processes.
Articles Related
Prerequisites
Recommended Tablespace Configuration
During the Oracle Business Analytics Warehouse configuration process, when you create the data warehouse tables, “Creating Data Warehouse Tables,” you can create tables in one tablespace and indexes in another tablespace. However, for performance reasons, it is recommended that you create tablespaces as described below
| Tablespace Name | List of Tables |
|---|---|
| DIM_STG | W_*DS |
| FACT_STG | W_*FS |
| DIM | W_*D and W_*MD |
| FACT | W_*F |
| AGG | W_*A |
| OTHER | Remaining W* tables |
| DIM_INDX | Indexes of W_*D tables (for example, other tables would include W*G and W*GS tables) |
| FACT_INDX | Indexes of W_*F tables |
| OTHER_INDX | Remaining indexes of W* tables |
To avoid fatal deadlocks during the ETL, make sure that you select the 'Session Level Retry on Deadlock' option in Informatica.
Oracle-Specific Database Guidelines
Configuration
To configure the Business Analytics Data Warehouse on Oracle databases more easily, refer to the parameter template files init10gR2.ora and init11g.ora. These files are located in
<DRIVE>:\<BI Applications install directory>\dwrep\Documentation\.
The parameter template files provide parameter guidelines based on the cost-based optimizer for Oracle 10g and 11g.
Copy the appropriate template file into your ORACLE_HOME/dbs directory. Then, review the recommendations in the template file, and make the changes based on your specific database configuration. The database administrator should make changes to the settings based on performance monitoring and tuning considerations.
Note: The NLS_LENGTH_SEMANTICS parameter enables you to define byte- or character-length semantics. Oracle BI Applications supports BYTE and CHAR values for this parameter. You can add this parameter to the init10gR2.ora and init11g.ora files if you are using MLS characters.
Suggestion for Optimizing Performance
This section contains additional suggestions for optimizing performance for Oracle databases.
- Oracle BI Applications under Oracle support only binary sorting. If you are running an Oracle client, do one of the following:
- Set the NLS_SORT parameter to BINARY.
- Choose a NLS_LANG setting that includes binary.
These settings are required for adequate performance from the dedicated Web client.
- Make sure that cost-based optimization is enabled in the Oracle development, test, and production databases and that statistics are kept up to date. Otherwise, the rule-based optimizer may be used.
- Create foreign keys in the Oracle database, but configure Oracle to not enforce the foreign key relationship. The existence of foreign keys will allow Oracle to better optimize certain queries. By turning off enforcement, the database load should not be negatively affected.
- Analyze application for occurrences of highly skewed data that is indexed. Create histogram statistics for these indexes to enable the optimizer to better perform queries.
- Make sure the temporary tablespace has adequate space.
- Set the number of log file groups to 4.
- Set the size of each log file to 10 MB.
SDU and TDU
To increase data throughput between Oracle BI Server and Oracle, change SDU and TDU settings in listener.ora. The default is 2 KB and can be increased to 8 KB.
- On the server side, edit the listener.ora file. Under the particular SID_LIST entry, modify SID_DESC as follows:
SID_LIST_LISTENER =
         SID_LIST =
            SID_DESC = (SDU=16384)(TDU=16384)
               ORACLE_HOME = /.....)
               SID_NAME = SOLAP)
         )
      )
- On the client side, edit the tnsnames.ora file. Modify the TNS alias by adding SDU= and TDU= as follows:
myhost_orcl.world=
         DESCRIPTION=(SDU=16384)(TDU=16384)
         ADDRESS = (PROTOCOL = TCP)(HOST=myhost)(PORT=1521))
      CONNECT_DATA=(SID=ORCL))
Typical Topology / Steps for an Oracle BI Applications Deployment
Installation
- Machine A (Windows-only) | Machine A is a machine that has installed Oracle Business Intelligence Enterprise Edition, on which you run the Oracle BI Applications installer to install the Oracle BI Applications files.
After the Oracle BI Applications files have been installed on Machine A, the DAC Client is installed on Machine B, and the DAC Server is installed on Machine C.
In addition, the following files are copied from the installation machine (Machine A) to the Business Intelligence Deployment Tier (Machine Group F) as follows:
- The OracleBI\Server\Repository\OracleBIAnalyticsApps.rpd file is copied from Machine A to the machine that runs the BI Server in Machine Group F.
- The OracleBIData\Web\Catalog\EnterpriseBusinessAnalytics\*.* files are copied from Machine A to the machine that runs the BI Presentation Services Catalog in Machine Group F.
ETL Tier (Functional)
- Machine B (Windows-only): Runs the DAC Client and Informatica PowerCenter Client Tools.
- Machine C (Windows, UNIX, Linux): Runs the DAC Server and Informatica PowerCenter Services.
- Machine D (Windows, UNIX, Linux): Hosts the transactional (OLTP) database.
- Machine E (Windows, UNIX, Linux): Hosts the Oracle Business Analytics Warehouse database.
BI Deployment Tier (Functional)
The BI Deployment tier is used to deploy the business intelligence dashboards.
- Machine Group F (Windows, UNIX, Linux): Machine Group F is a group of machines that runs the Oracle Business Intelligence Enterprise Edition components. For example, one machine might run the BI Server and another machine might run the BI Presentation Services.
Prerequisites
A complete preinstallation of OBIEE on a Windows Machine
The Oracle BI Applications installer requires that you have already installed Oracle Business Intelligence Enterprise Edition on a Windows machine. The instance of Oracle Business Intelligence Enterprise Edition must be a complete installation; that is, you must install it using the Complete setup type option. This installation is only required to enable the Oracle BI Applications installer to install the Oracle BI Applications files on a machine.
System requirements
All the below informations can be found in this document: System Requirements and Supported Platforms for Oracle® Business Intelligence Applications
Software Version
| Software | Version |
|---|---|
| Oracle Business Intelligence Enterprise Edition | 10.1.3.4.1 |
| Informatica PowerCenter | 8.6.1 with Hotfix 6 |
| Data Warehouse Administration Console (DAC) | 10.1.3.4.1. with Patch 9179169 (file p9179169_101341_Generic.zip) |
| Oracle Database | 10gR2: 10.2.0.4. or higher, 11gR1: 11.1.0.7, 11gR27: 11.2.0.1 or higher |
DAC and Informatica PowerCenter must be colocated
- Informatica must be installed before installing DAC.
- Informatica PowerCenter Client Tools and the DAC Client must be co-located on the same machine.
- PowerCenter Services and the DAC Server must be co-located on the same machine.
- The DAC Client can only be installed on Windows.
- The correct version of the JDK is installed by the DAC installer.
DAC produces parameter files that are used by Informatica. If an execution plan fails in DAC and you want to debug the workflow by running it directly from Informatica, then the parameter file produced by DAC should be visible to Informatica. This is one reason for the requirement to co-locate the DAC and Informatica components as stated above.
The DAC Client uses the Informatica pmrep and pmcmd command line programs when communicating with Informatica PowerCenter. The installation of PowerCenter Client Tools provides the pmrep executable file. The installation of PowerCenter Services provides the pmcmd executable file. The DAC installer performs post-install configuration tasks related to the pmrep and pmcmd executable files.
Hardware Requirements
| Oracle Business Analytics Warehouse | CPU: 2 GHz or better, 8 CPU cores minimum, RAM: 8 GB |
| ETL Client (Oracle Business Intelligence Data Warehouse Administration Console Client and Informatica PowerCenter Client Tools) | CPU: 1 GHz or better, RAM: 1 GB |
| ETL Server (Oracle Business Intelligence Data Warehouse Administration Console Server and Informatica PowerCenter Services) | CPU: 2 GHz or better, 4 CPU cores minimum. RAM:8 GB. Storage Space:100 GB free space |
Operating System
| Informatica PowerCenter Services (Oracle Business Intelligence Data Warehouse Administration Console Server version 10.1.3.4.1) | Oracle Enterprise Linux 5 (32-bit)3. Processor: x86 |
| Informatica PowerCenter Client Tools (Oracle Business Intelligence Data Warehouse Administration Console Client version 10.1.3.4.1) | Windows 32 bit Xp and above 2000 |
Source System
Oracle eBusiness Suite R12.1.1 is supported with Oracle Business Intelligence Applications version 7.9.6.1.
Setting the NLS_LANG Environment Variable for the Oracle client
Setting NLS_LANG correctly allows proper conversion
- from the client operating system character set
- to the database character set.
When these settings are the same, Oracle assumes that the data being sent or received is encoded in the same character set as the database character set, so character set validation or conversion may not be performed. This can lead to corrupt data if the client code page and the database character set are different and conversions are necessary.
You need to set the NLS_LANG environment variable on each machine that has the Oracle client installed.
The NLS_LANG character set should reflect the setting of the operating system character set of the client.
For example, if the database character set is AL32UTF8 and the client is running on a Windows operating system, then you should not set AL32UTF8 as the client character set in the NLS_LANG parameter because there are no UTF-8 WIN32 clients. Instead, the NLS_LANG setting should reflect the code page of the client.
To determine the code page of the Windows machine, run the following command
C:\Documents and Settings\Administrator>chcp
Active code page: 437
And then set the appropriate character set for the NLS_LANG windows environment variable.
Oracle BI Applications Installer
- biapps_windows_7961\Oracle_BI_Applications\setup.exe
- Welcome page
- Enter the OBIEE paths. For a standard installation, they are for the installation (C:\OracleBI) and for the data (C:\OracleBIData)
- Select the application that you want to install. The first one for instance: Financial Analytics (Commercial)
- Summary > Next. Wait until the Finish button is displayed
- Finish
The version file version_apps.txt can be found in this directory OracleBI_Home\Document\
Build: 7.9.6.1.100609.2038
Release Version: Oracle Business Intelligence Applications 7.9.6.1
Package: 100609.2038
The following directories or files have been created:
- The ORACLEBI_HOME\dwrep folder.
- The ORACLEBI_HOME\dwrepdwrep\DAC_metadata folder.
- The Oracle BI Applications repository file named OracleBIAnalyticsApps.rpd in the ORACLEBI_HOME\dwrep\server\Repository folder with as credential Administrator/SADMIN
- The Presentation Catalog in the ORACLEBIDATA_HOME\dwrep\web\catalog folder. The Presentation Catalog is provided as a zipped file named EnterpriseBusinessAnalytics.zip and will need to be unzipped before it can be used.
- The ORACLEBI_HOME\Upgrade folder containing repository files from previous versions of Oracle BI Application and Siebel Analytics Application releases.
Create the database container
Oracle Database - Installation
With the init.ora parameter file that is located in OracleBI_Home\dwrep\Documentation.
The init files contains very valuable informations and a schema for datawarehouse database creation.
One or more database instance are needed to hold the following:
- DAC Repository
- Domain Configuration Database
- Informatica Repository
- Oracle Business Analytics Warehouse
Note the following points:
- The transactional (OLTP) database user that is registered in DAC should be the database table owner. Alternatively, at a minimum, the user registered in DAC must have read privileges on the transactional database for all tables and aliases as well as rights to create triggers and views on all tables and aliases.
- For efficient ETL, DAC and Informatica components utilize multiple connections to the Oracle Business Analytics Warehouse. The Oracle Business Analytics Warehouse database must allow for a minimum of 100 connections to be made by DAC and Informatica. In addition, ensure that these connections are not allowed to time out. Consult with your network administrator and DBA for information on how to ensure these requirements.
- Make sure that the Oracle Business Analytics Warehouse instance is granted the SSE_ROLE.
CREATE ROLE SSE_ROLE;
GRANT CONNECT TO SSE_ROLE;
GRANT RESOURCE TO SSE_ROLE;
GRANT SELECT ANY TABLE TO SSE_ROLE;
GRANT INSERT ANY TABLE TO SSE_ROLE;
GRANT UPDATE ANY TABLE TO SSE_ROLE;
GRANT DELETE ANY TABLE TO SSE_ROLE;
GRANT GRANT ANY OBJECT PRIVILEGE TO SSE_ROLE;
GRANT GRANT ANY PRIVILEGES TO SSE_ROLE;
For an Oracle database, the following additional privileges SELECT, INSERT, UPDATE, DELETE, GRANT must be granted to the SSE ROLE if the DAC Repository and the Informatica Repository are stored in a different database from the data warehouse database
CREATE USER DWH_REP IDENTIFIED BY DWH_REP
DEFAULT tablespace users
TEMPORARY tablespace temp
quota unlimited ON users;

GRANT CONNECT, resource, CREATE VIEW TO DWH_REP;
GRANT SSE_ROLE TO DWH_REP;
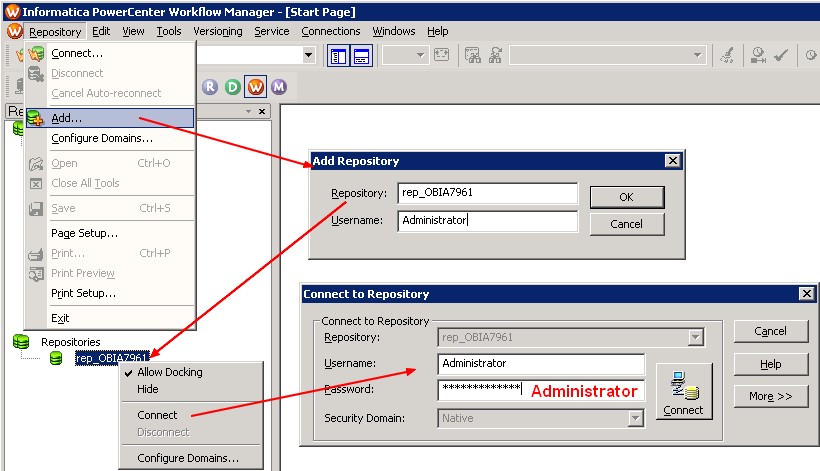
Informatica PowerCenter
Restoring the Prebuilt Informatica Repository
- On Windows copy the Informatica Repository file called Oracle_BI_DW_Base.rep installed into the OracleBIHome\dwrep\Informatica\Repository directory to the \Informatica PowerCenter8.6.1\server\infa_shared\Backup directory.
- In Informatica PowerCenter Administration Console, select the Repository Service
- In the General Properties area of the Properties tab, make sure the OperatingMode value is Exclusive.
When you run the Repository Service:
- in normal mode, you allow multiple users to access the repository to update content.
- in exclusive mode, you allow only one user to access the repository to be able to do maintenance actions.
- Choose Actions, then Delete Contents > Enter the admin credentials. In this powercenter installation, you will find for instance admin/admin. Table and view are dropped from the repository schema.
- Choose Actions > Restore Contents.
- At the Restore Contents dialog box, select Oracle_BI_DW_Base.rep, select the Restore as New check box and click ok.
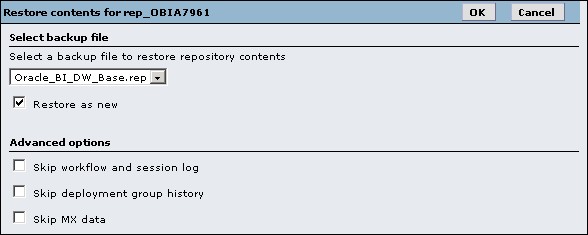
- Confirm the warning message that you get over the users and grouped that will be dropped.
- You must then see at the end of the process this message:
Action Status for Restore Contents: Succeeded.
Repository Service is running in exclusive mode, please restart the Repository Service to change to normal mode.
- The repository must be promoted from a local (standalone) to a global repository, making it accessible to all local repositories in the repository domain. Check the Global Repository checkbox and hit the Ok button. Enter the administrator credentials (admin/admin for instance) when prompted.
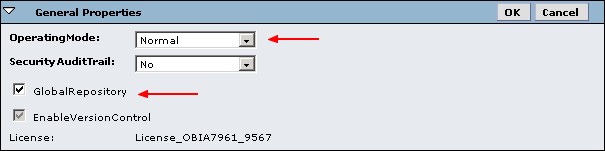
- Then change the mode to Normal.
Informatica PowerCenter Configuration
Source Files and Lookup Files
Copy from the OBIA installation machine:
- the source files from \OracleBI\dwrep\Informatica\SrcFiles
- the lookup files from \OracleBI\dwrep\Informatica\LkpFiles
on the Informatica PowerCenter Server Machine respectively:
- in the PMSourceFileDir directory The value of the PMSourceFileDir parameter must match the DAC system property called InformaticaParameterFileLocation.
- in the PMLookupFileDir directory
You can see the parameters values PMSourceFileDir and PMLookupFileDir in the administration console in the process tab of the integration service.

Disable code page validation: ValidateDataCodePages Property
ValidateDataCodePages enforces data code page compatibility.
When this option is disable, the restrictions are lifted for source and target data code page selection, stored procedure and lookup database code page selection, and session sort order selection.
Administration Console > Integration Service > Properties tab. > Configuration Properties > Edit and Deselect the 'ValidateDataCodePages' check box.
The Integration Service performs data code page validation in Unicode data movement mode only (General Properties section).
- Option available if you run the Integration Service in Unicode data movement mode.
- Option disabled if you run the Integration Service in ASCII data movement mode.
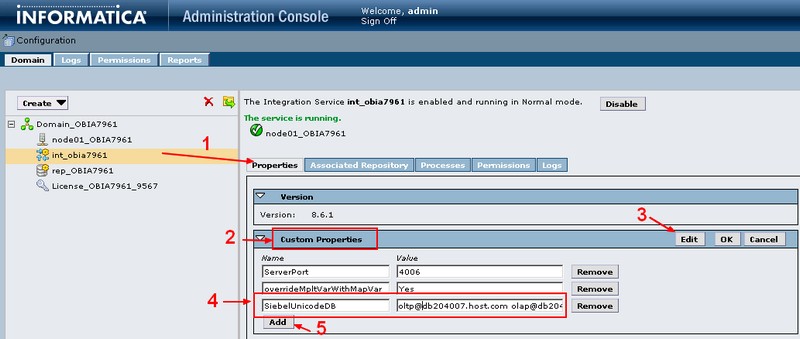
Integration Services Custom Properties
Administration Console > Integration Service > Properties tab. > Custom Properties area > Edit and add the following parameters:
- ServerPort with a port number
Enter the number of an available port. For example, 4006. This custom property configures Informatica PowerCenter Services to listen on the Server port number. DAC communicates with the PowerCenter Integration Services service using this port.
- overrideMpltVarWithMapVar with the value Yes
Enables Informatica to evaluate parameters within mapplets.

Configuring the SiebelUnicodeDB Custom Property
This procedure is not specific to the Siebel source system. It must be performed for all types of source systems.
If your source to target data movement configuration is Unicode to Unicode, you need to create a custom property called SiebelUnicodeDB on Integration Services. If your source to target data movement configuration is either Code Page to Code Page or Code Page to Unicode, you do not need to create this property.
In the custom properties of the integration service, you must add one properties with:
- as name: SiebelUnicodeDB
- as value field: [user_OLTP]@[connectString_OLTP] [user_OLAP]@[ConnectString_OLAP]
For example, [email protected] [email protected] where:
| Value | Is the | Value Field | Description |
|---|---|---|---|
| oltp | is the | [user_OLTP] | The database user for the OLTP source database |
| db204007.host.com | is the | [ConnectString_OLTP] | The connect string for the OLTP database |
| olap | is the | [user_OLAP] | The database user for the Oracle Business Analytics Warehouse database |
| db204008.host.com | is the | [ConnectString_OLAP] | The connect string for the data warehouse database |
- You must always leave a space between the OLTP and OLAP strings.
- The values must match exactly the value you entered when creating the relational connection for the OLTP or OLAP in Informatica Workflow Manager. (The case is then also important)
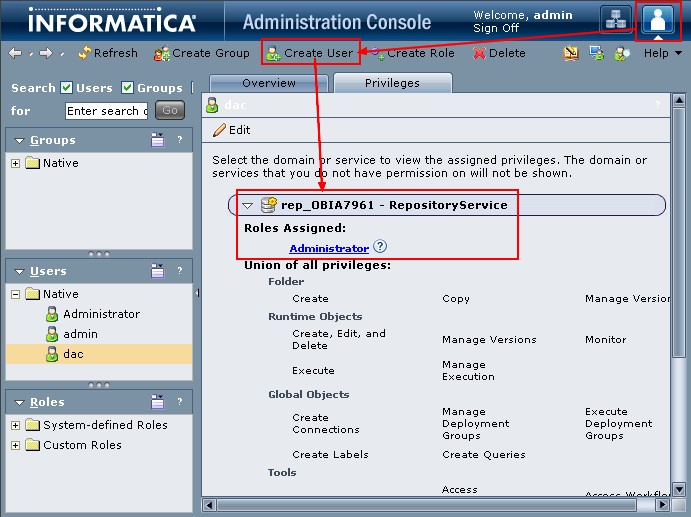
DAC user
- Administration Console as admin > Configure Security > Create a dac User in the native domain Do not create this user in an LDAP domain or select an existing user from an LDAP domain.
- Privileges tab of the new user > Expand the appropriate Repository Service > select the Administrator role check box.
Informatica Workflow Manager Relational Connection
You need to create a connection for:
- each transactional (OLTP) database,
- and for the Oracle Business Analytics Warehouse (OLAP) database.
Example for the DataWarehouse:
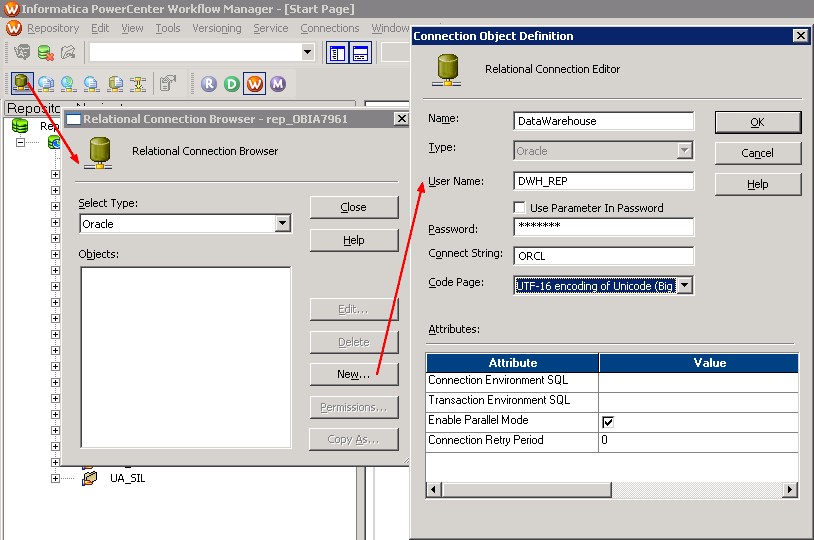
Where:
- code page is the code page of the oracle database
- connect string is the TNSNAMES entry for the Oracle Database
For the EBS target:
- Name: ORA_R1211
- User: APPS/APPS
- Connect String: ebs121
The name of the relational connection must match the name entry in the set up “Physical Data Source” tab of the DAC Client
DAC
DAC Installation
The DAC installer installs DAC in the \orahome\10g\bifoundation\dac directory.
ODBC Database Connections for the DAC Client
The DAC Client uses an ODBC connection to create and alter tables in the Oracle Business Analytics Warehouse.
If your source system is Siebel CRM, you must create an additional ODBC connection to the OLTP (source) database
Create a DSN Odbc Connection (ODBC - How to create a DSN connection in Windows) to the Oracle Business Analytics Warehouse database on the machine that hosts the DAC Client with the following:
- Data Source Name: Enter any meaningful name such as OBIA_DWH
- Server Name: Enter the tnsname of the Oracle Business Analytics Warehouse.
- Client Version: Select 10gR1 for 10g and 11g databases.
- ODBC Driver: Oracle Merant ODBC Driver that is installed with the DAC platform installation.
Enable Communication Between Informatica PowerCenter and DAC (with pmcmd and pmrep)
DAC uses the Informatica pmrep and pmcmd command line programs to communicate with Informatica PowerCenter in the following ways:
- DAC Server uses
- pmrep to communicate with PowerCenter Repository Services.
- pmcmd to communicate with PowerCenter Integration Services to run the Informatica workflows.
- DAC Client uses
- pmrep to synchronize tasks with Informatica workflows and to keep the DAC task source and target tables information up to date.
The pmrep/pmcmd program must be installed:
- in the PowerCenter Client (\PowerCenter_home\client\bin)
- and in the PowerCenter Services bin directories (\PowerCenter_home\server\bin).
It's why the two software (client as server) must co-located.
The pmrep is already installed with the default installations and the pmcmd program must be manually copied from the PowerCenter Services bin folder to the PowerCenter Client bin folder.
Copying the DAC Metadata Files
DAC metadata files are extracted by the Oracle BI Applications installer (in the directory OraclelBI\dwrep\DAC_metadata\) and you need to copy these files to the machines hosting the DAC Client and Server.
DAC_Client in this table is the directory OraclelBI\dwrep\DAC_metadata
| DAC Machine | File/Folder Name | Source File/Folder | Destination File/Folder |
|---|---|---|---|
| Client | The complete Export folder | DAC_metadata\DAC_Client\export | DacHome\bifoundation\dac\export |
| Client | The deletetriggers.list file | DAC_metadata\DAC_Client | DacHome\bifoundation\dac\conf |
| Server | The parameterfileOLTP.txt file | DAC_metadata\DAC_Server | DacHome\bifoundation\dac\Informatica\parameters\input |
| Server | The parameterfileDW.txt file | DAC_metadata\DAC_Server | DacHome\bifoundation\dac\Informatica\parameters\input |
Importing Metadata into the DAC Repository
- To avoid possible ETL errors in other applications (for example, missing tasks), you must import the Universal application.
- Do not select the Data Warehouse option unless Oracle specifically instructs you to do so. This container is reserved for special purposes.
- Make a note of the Application names that you select. When you create data warehouse tables later in the configuration process, you might need to type in the names exactly as they are displayed here
- If you are importing DAC metadata for the first time, you should select the Truncate Repository Tables check box. If you are importing DAC metadata into a repository that already has metadata, do the following:
- Select the Enable Batch Mode check box. If you are using an Oracle 9i Release 2 database, you cannot use batch mode because the Oracle 9i JDBC drivers do not handle array inserts or bulk inserts.
- To confirm that you want to import the seed data selected, re-type the text in the text box and click Yes.

If your source or target database is a DB2/390 database, run DAC_DB2390_Source.sql or DAC_DB2390_Target.sql immediately after importing the seed data by connecting to the database where the DAC Repository resides. These files are stored in the \DAC directory.
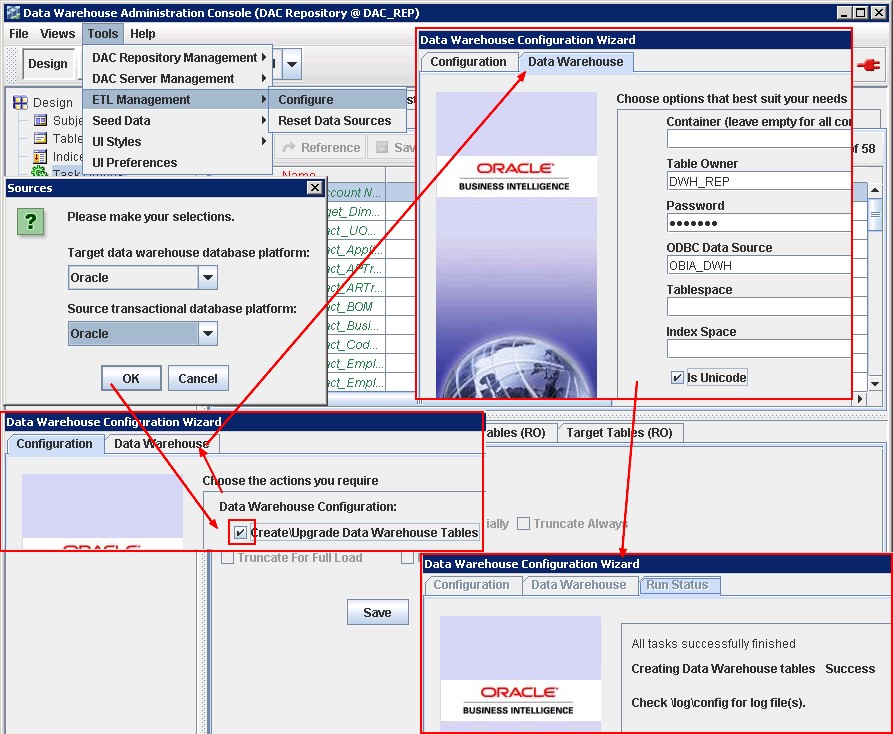
Creating the Data Warehouse Tables
- The Oracle Business Analytics Warehouse tables are created by the DAC Client. The DAC Client uses ODBC connections to the Oracle Business Analytics Warehouse database for this procedure.
- Make sure that the SSE role has been created for the Oracle Business Analytics Warehouse, and that the database user has been associated with the role
as sys@obia_dwh
SELECT * FROM V$NLS_PARAMETERS where parameter = 'NLS_CHARACTERSET';
PARAMETER                      VALUE
------------------------------ ------------------------------
NLS_CHARACTERSET               AL32UTF8
If a 'Success' message is displayed, the data warehouse tables have been created. If you want to see log information about the process, use the following log files.
- DAC_Home\bifoundation\log\config\generate_ctl.log - A log of the schema definition process, including details of any conflicts between containers.
- DAC_Home\bifoundationlog\config\createtables.log - A log of the DDLIMP process.
If a 'Failure' message is displayed, the data warehouse tables have not been created. Use the log information in DAC_Home\bifoundation\log\config\generate_ctl.log to diagnose the error. The createtables.log is not generated.
Starting the DAC Server
On Windows, start the DAC Server by double-clicking the \DAC\startserver.bat script.
title Oracle DAC Server
call config.bat

Rem Uncomment the below if you want to see a DOS window with messages.
Rem  and comment out the JAVAW line.
Rem
%JAVA%  -Xms256m -Xmx1024m -cp %DACCLASSPATH% -Duser.dir=%DAC_HOME% com.siebel.etl.net.QServer
Rem

Rem start %JAVAW% -server -Xms256m -Xmx1024m -cp %DACCLASSPATH% -Duser.dir=%DAC_HOME% com.siebel.etl.net.QServer
28-sep-2010 4:34:47 com.siebel.etl.bootup.DAWUtils checkPermission
SEVERE: Checking the localhost with the values defined in the DAC repository!
28-sep-2010 4:34:47 com.siebel.etl.bootup.DAWUtils checkPermission
INFO: Adding server name : localhost
28-sep-2010 4:34:47 com.siebel.etl.bootup.DAWUtils checkPermission
INFO: Adding alternate server name : localhost
1  SEVERE  Tue Sep 28 04:34:47 PDT 2010  Checking the localhost with the values defined in the DAC repository!
2  INFO  Tue Sep 28 04:34:47 PDT 2010  Adding server name : localhost
3  INFO  Tue Sep 28 04:34:47 PDT 2010  Adding alternate server name : localhost
4  INFO  Tue Sep 28 04:34:47 PDT 2010  Bound to port 3141
5  INFO  Tue Sep 28 04:34:47 PDT 2010  Creating ClientMessage Dispatcher with 2 worker-threads
6  INFO  Tue Sep 28 04:34:47 PDT 2010  SERVER_NETWORK_MESSAGE: Created ClientMessage Dispatcher with 2 worker-threads
7  INFO  Tue Sep 28 04:34:47 PDT 2010  com.siebel.etl.net.ClientMessageDispatcher registered with HeartBeatManager
8  INFO  Tue Sep 28 04:34:47 PDT 2010  CONNECTION_ISSUE Repository starting polling
9  INFO  Tue Sep 28 04:34:47 PDT 2010  CONNECTION_ISSUE Repository 10 aquired for polling
10 INFO  Tue Sep 28 04:34:47 PDT 2010  CONNECTION_ISSUE Repository ending polling
DAC Setup
DAC System Properties
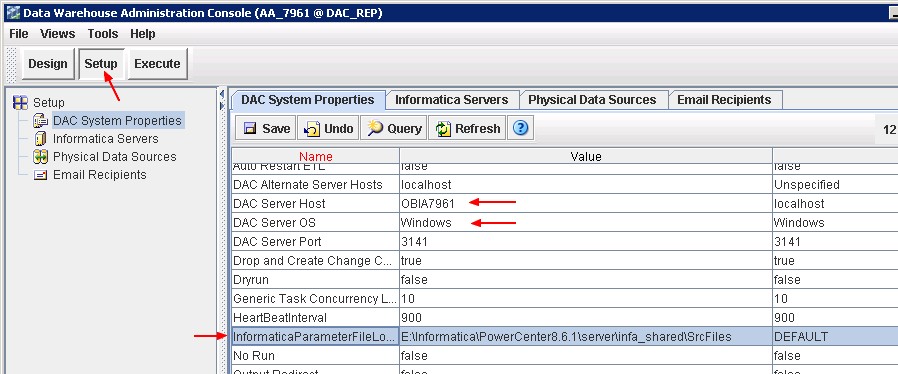
Where:
- DAC Server Host is the name or IP address of the machine that hosts the DAC Server.
- DAC Server OS is the operating system of the machine that hosts the DAC Server. Possible values are Windows, AIX, Solaris, HP-UX, Linux (case sensitive).
- InformaticaParameterFileLocation is the path to the Informatica source file directory (the PMSourceFileDir parameter of Informatica PowerCenter), for example \Informatica\PowerCenter8.6.1\ server\infa_shared\SrcFiles. You can find it the PowerCenter Administration Console > General Properties area of the Processes tab. It contains the ParameterFile of the PowerCenter Mapping.
For a description of all DAC System Properties, see “How to Set DAC System Properties”
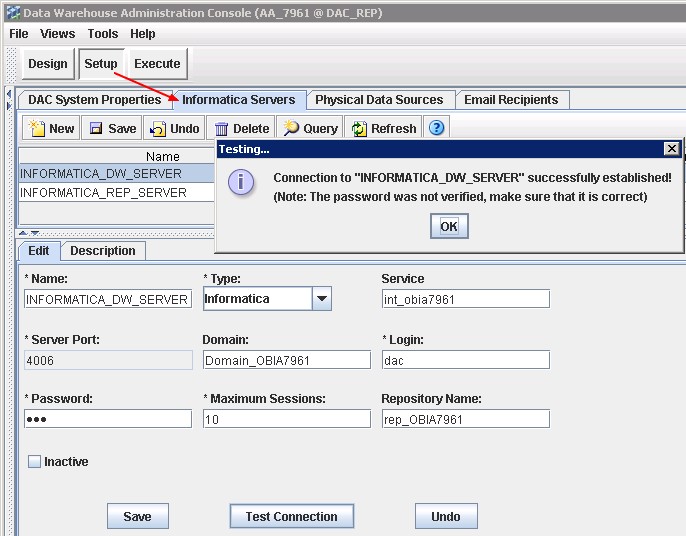
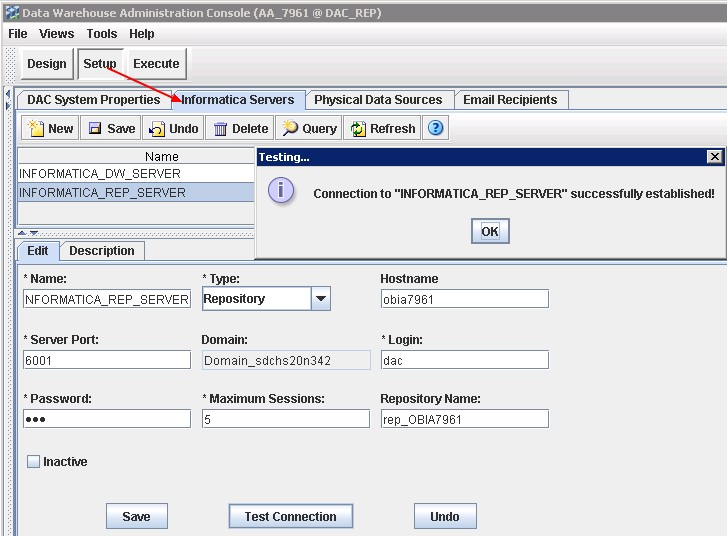
Informatica Servers
Be sure that you have the INFA_HOME\Server\bin and INFA_HOME\Client\bin in the PATH environment variable. Otherwise DAC Server and DAC client can't found the pmcmd and pmcrep programs and the connection test will fail
For a test machine without a lot of power, you can divide by two the parameter maximum session. Determining the maximum number of session
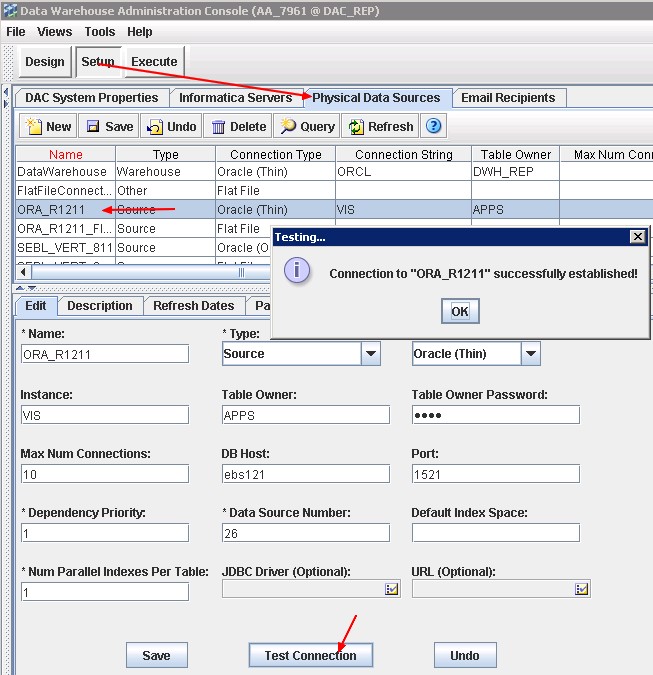
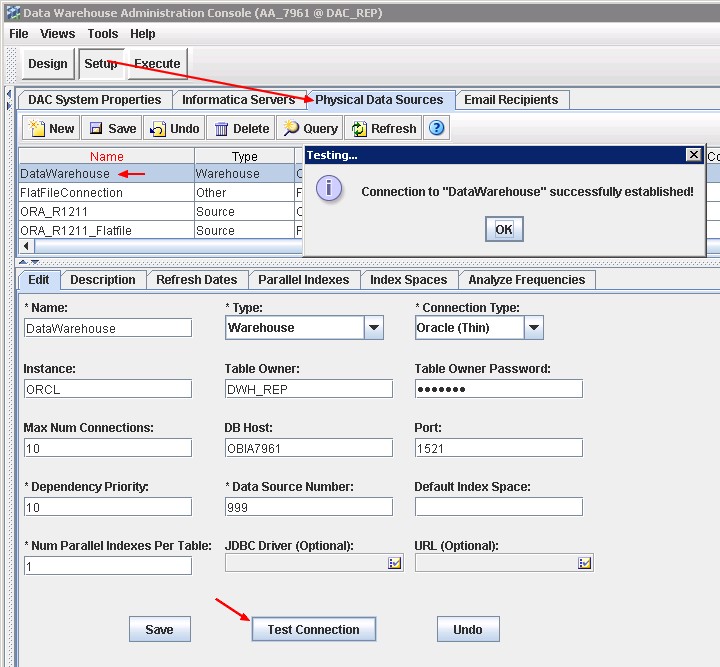
Physical Data Source
The Physical Data Sources tab displays a precreated record for the data warehouse with the name DataWarehouse, and one or more records for the OLTP sources. The records that are created by DAC for the OLTP sources depend on the business application source systems you selected when importing the DAC metadata.
You must set up as data source only :
- the datawarehouse database (DataWarehouse)
- and the source database (ORA_R1211)
The file “Connection Type” doesn't need any configuration.
 |  |
where:
- Dependency Priority is the number used to generate dependencies when designing execution plans.
- Data Source Number is an Unique number assigned to the data source category so that the data can be identified in the data warehouse. For example, the value '1' is used for Siebel data sources. Oracle recommends that you do not change the default value. If you are specifying a data source without using a pre-defined template, you must use the correct value for that data source category. For example, if you specify an Oracle EBS R12 data source, you must specify the DATASOURCE_NUM_ID value '9'. For a complete list of supported data sources and DATASOURCE_NUM_ID values, see the section entitled, “How to Configure Data Source Num IDs,” in Oracle Business Intelligence Applications Configuration Guide for Informatica PowerCenter Users.
The data source number is passed as a parameter to the Informatica workflows. If you are using multiple sources, each data source has a unique number. Typically, all source dependent extracts will use this parameter to populate the DATASOURCE_NUM_ID column, and the source independent workflows will carry these values to the final dimension and fact tables.
Email Recipient
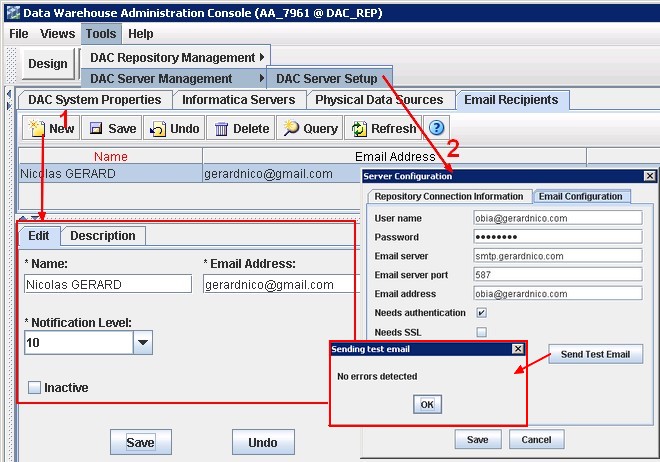
Create the mails that you need on the setup > Email Recipient tab with the notification levels as follows:
- 10 – Notifies recipient of success or failure of each task.
- 5 – Notifies recipient of success of failure of the entire ETL process.
- 1 – Notifies recipient that ETL completed successfully.
Inactive indicates whether the selected email activation is active or inactive.
To set up the SMTP parameters, you must go to Tools > DAC Server Setup > Email Configuration (Email - How to verify your SMTP connection and parameters (TSL/SSL) with TELNET ?)

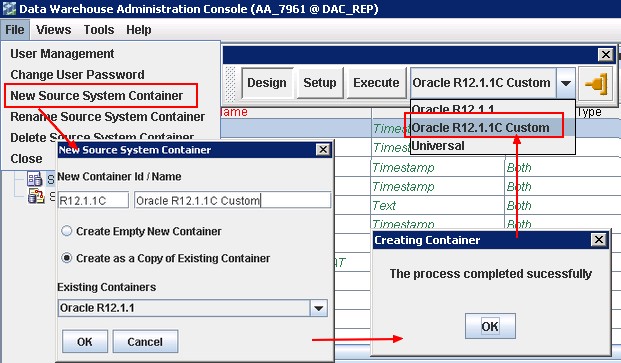
Creation of a container
You cannot make any changes to the preconfigured containers. You must make a copy of a container before you can make any changes to it
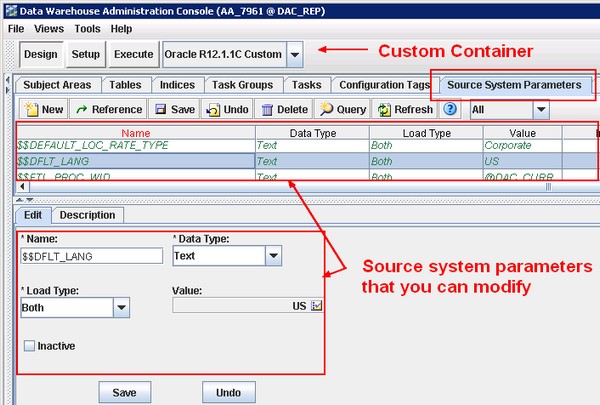
Source System Parameters
You set source system parameters (also known as DAC ETL Preferences) in DAC to specify how the ETL routines process data for a container. For example, if operating in the United States, you might set the $DLFT_COUNTRY to 'USA' to identify your data.
The following preferences are applied to all tasks within a container.
If extracting data from more than one source, these preferences will need to be re-applied to each associated container. They can be overridden at the task level by adding the parameter to the specific task and assigning a value there.
With the copy of the container, modify the parameters:
OBIEE
-
- Especially the repository variables OLAP_DSN, OLAP_USER and OLAPTBO.
- And don't forget to unzip the catalog file: OracleBIData_Home\web\catalog\EnterpriseBusinessAnalytics.zip
The Oracle BI Applications repository file named OracleBIAnalyticsApps.rpd in the ORACLEBI_HOME\dwrep\server\Repository folder has as credential: Administrator/SADMIN or Administrator/Admin123
Post-task installation
Duplicate rows in per_all_people_f
Before starting a full load (Bi Apps: Problems With Index Creation During Full Load), you must be sure that you don't have any duplicate in the table per_all_people_f. You may find in the vision database (the sample database of EBS) a bad record.
SELECT person_id,
  effective_start_date,
  effective_end_date
FROM per_all_people_f
WHERE person_id = 6272;
| person_id | effective_start_date | effective_end_date |
|---|---|---|
| 6272 | 04-JAN-91 | 06-FEB-02 |
| 6272 | 04-JAN-91 | 31-DEC-12 |
A person id can't be effective for the same date. This is technically possible because the database uniqueness depends on person_id, effective_start_date, effective_end_date, all three of them. However, this is functionally not possible. You must then correct the second line with the value 07-FEB-02 for the effective_start_date.
My Oracle Support
- Database connection name PARAM_OLTP_ORA11I is not well defined
Following 2 mappings failing in 7.9.6 (SDE_ORA_Stage_ARTransactionFact_DiffManDerive, SDE_ORA_Stage_GLRevenueFact_DiffManDerive ) with this error :“Database connection name PARAM_OLTP_ORA11I for database connection variable DBConnection_OLTP is not well defined.” See this solution: SDE_ORA_Stage_ARTransactionFact_DiffManDerive error
- ORA-00001: unique constraint error for W_AR_XACT_F_U1 index
Don´t add the “SA Financial - Group Account Cleanup” subject area in the execution plan. See ORA-00001: unique constraint error for W_AR_XACT_F_U1 index
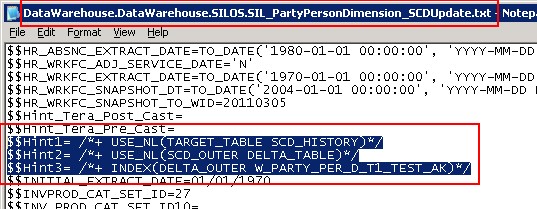
$$Hint1= /*+ USE_NL(TARGET_TABLE SCD_HISTORY)*/
$$Hint2= /*+ USE_NL(SCD_OUTER DELTA_TABLE)*/
$$Hint3= /*+ INDEX(DELTA_OUTER W_PARTY_PER_D_T1_TEST_AK)*/
No gateway connectivity is provided for domain
In the DAC log file (located DAC_Home\10gR3_1\bifoundation\dac\log), you can find the log file of the execution (such as Financial_Analytics_Gerardnico.21484569.log) and found this error:
Request to start workflow : 'SIL_InsertRowInRunTable' has completed with error code 3
Error Message : An error occurred in starting or running or stopping the workflow or task.
Just grab the pmcmd command and test it in a DOS shell.
>pmcmd startworkflow -sv int_obia7961 -d Domain_OBIA7961 -u dac -p dac -wait -f SILOS -paramfile E:\Informatica\PowerCenter8.6.1\server\infa_shared\SrcFiles\FlatFileConnection.DataWarehouse.SILOS.SIL_InsertRowInRunTable.txt SIL_InsertRowInRunTable

Informatica(r) PMCMD, version [8.6.1 HotFix10], build [412.0123], Windows 32-bit
Copyright (c) Informatica Corporation 1994 - 2010
All Rights Reserved.

Invoked at Sat Nov 06 13:15:54 2010

[PCSF_46007] No gateway connectivity is provided for domain [Domain_OBIA7961].
ERROR: Cannot connect to Integration Service [int_obia7961].

Completed at Sat Nov 06 13:15:54 2010
This error comes from that pmcmd can't find the dd'efinition file of the domains. Just set up the INFA_DOMAINS_FILE environment variable to point out to the domains.infa file such as:
C:\>set INFA_DOMAINS_FILE=E:\Informatica\PowerCenter8.6.1\domains.infa
More log: E:\Informatica\PowerCenter8.6.1\server\infa_shared\SessLogs
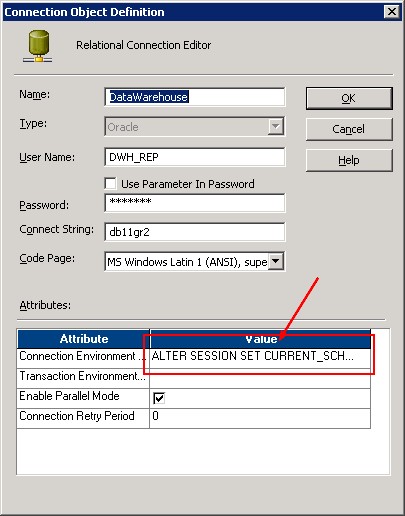
W_PARAM_G - Lookup table not found in the database
I don't know why but it seems that the current schema is not the good one when integration service does a connection with the Oracle Database.
To resolve this problem, you can add this command in the connection environment SQL of the relational database parameters:
ALTER SESSION SET CURRENT_SCHEMA = "DWH_REP";
Running A Full Load ETL
After you have installed and configured Oracle BI Applications, your Oracle Business Analytics Warehouse (OLAP) database is empty. You need to perform a full load ETL to populate your Oracle Business Analytics Warehouse.
The ETL processes for Oracle BI Applications are created and managed in DAC.
This section uses an example to show you how to get started quickly with running a full load ETL. In this example, you have installed Oracle Financial Analytics with an Oracle EBS OLTP data source, and you want to load OLTP data for the subject area Receivables, as follows:
- In the Design/Setup view, you may still display the Properties tab and verify them.
- Then Display the Execute view, and display the Execution Plan tab.
- Click New, display the Edit tab, and use the Name field to specify a name for the ETL process.Save
- Display the Subject Areas tab and click Add/Remove to display the Choose Subject Areas dialog box.
- Select the new container that you created in step 4 from the container drop-down list at the top of the Choose Subject Areas dialog box.
- Select Financials - Receivables, click Add, then click OK.
- Display the Parameters tab, and click Generate.
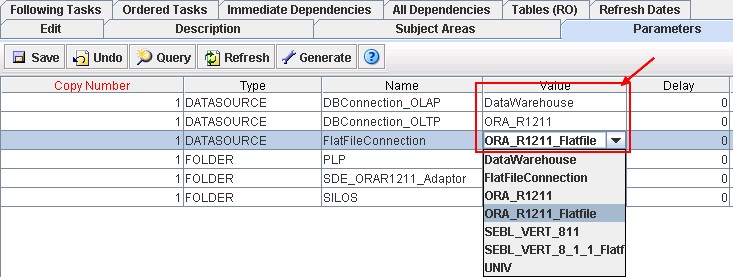
- On the Parameters tab, edit the parameters as follows:
- Edit the value of DBConnection_OLAP and set it to the same value as the name of the OLAP database that you specified in the Physical Data Source dialog box (for example, DataWarehouse).
- Edit the value of DBConnection_OLTP and set it to the same value as the name of the OLTP database that you specified in the Physical Data Source dialog box (for example, ORA_R1211).
- If there is a FlatFileConnection parameter, edit the value of FlatFileConnection and set it to the same value as the name of the flat file data source that is specified in the Physical Data Source dialog box (for example, ORA_R1211_Flatfile).
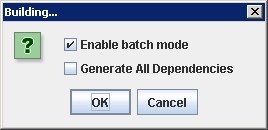
- On the Execution Plans tab, click Build. Answer the question.
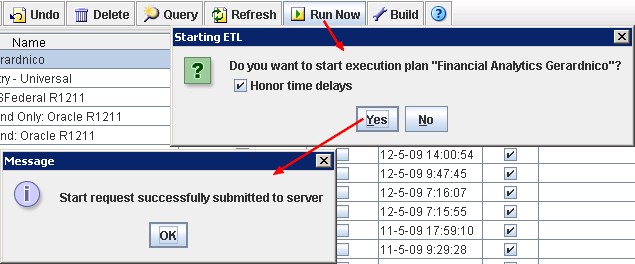
- On the Execution Plans tab, click Run Now. DAC will perform a full load for Financials - Receivables.
- Use the Current Run tab to check the status of the ETL run.
If the ETL run:
- fails, you can see information in the status description and the error code column, otherwise you will find useful information in the Log files
- was successful, you will see 'Success' in the Run Status field, and the End Timestamp value will be set to the time and date when the ETL was completed. And if you have set a SMTP server, you must received this kind of mail:
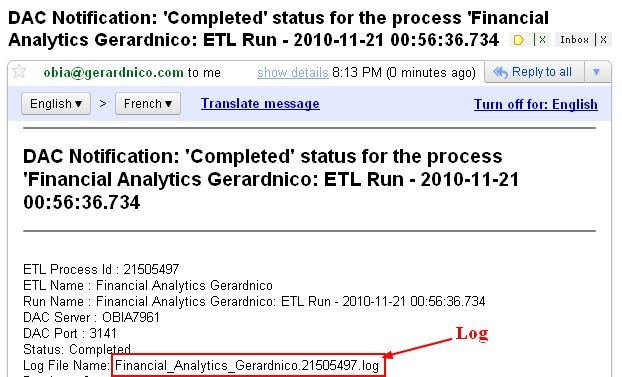
Notice the global log file. It's in the DAC log directory and have the process id number
If an ETL run fails, you cannot re-run the ETL until the failed ETL has been cleared from the Current Run tab. To clear an ETL from the Current Run tab, right click on the ETL and select Mark As Completed.
Result
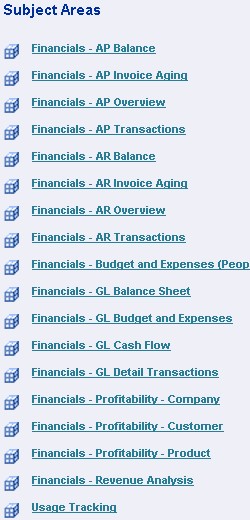
Dashboard

Subject Area
Support
Problem during the load
For any DAC problem (also during the load), see the log files.
DAC
Metadata Import fails
If the process fails, use the \DAC\log\import.log file to diagnose errors.
Create Datawarehouse table fails
If a 'Failure' message is displayed, the data warehouse tables have not been created. Use the log information in DAC_Home\bifoundation\log\config\generate_ctl.log to diagnose the error. The createtables.log is not generated.
Server: SEVERE: Checking the localhost with the values defined in the DAC repository!
It's not an error. You have to continue the configuration process in order to set them after the first start of the DAC Server.
Log
The log files are located in DAC_HOME\dac\log. (such as C:\orahome\10gR3_1\bifoundation\dac\log)
Example of content of an error file:
ANOMALY INFO::: Error while executing pmcmd pingservice -sv obia7961int_obia7961 -d Domain_OBIA7961
MESSAGE:::Cannot run program "pmcmd": CreateProcess error=2, The system cannot find the file specified
For the tip, this error occurs when you forget to add the INFA_HOME\Server\bin or/and INFA_HOME\Client\bin in the PATH environment variable
How to ping an informatica domain ?
E:\Informatica\PowerCenter8.6.1\server\bin>infacmd.bat ping
[ICMD_10135] Command requires at least one option specified.
[ICMD_10004] Usage:
  ping [<-DomainName|-dn> domain_name]
       [<-ServiceName|-sn> service_name]
       [<-GatewayAddress|-dg> domain_gateway_host:port]
       [<-NodeName|-nn> node_name]
       [<-ResilienceTimeout|-re> timeout_period_in_seconds]

E:\Informatica\PowerCenter8.6.1\server\bin>infacmd.bat ping -dn "Domain_OBIA7961"
[ICMD_10052] Domain [Domain_OBIA7961] Host:Port [OBIA7961:6001] was successfully pinged.